Connection to DataBase in Python, R
python, R에서 Database Server와 연결하기

위 그림처럼 Database Server와 연결하기 위해서는 1. Driver Manager 혹은 2. DSN(Data Source Name)을 알아야합니다.
Driver Manager와 DSN이 무엇인지 하나씩 알아보겠습니다.
Driver Manager & Driver
oracle에서는 Driver Manager를 다음과 같이 정의하고 있습니다.
The Driver Manager is a library that manages communication between application and driver or drivers. It performs the following tasks:
Resolves Data Source Names (DSN). The DSN is a configuration string that identifies a given database driver, database, database host and optionally authentication information that enables an ODBC application to connect to a database using a standardized reference.
Because the database connectivity information is identified by the DSN, any ODBC-compliant application can connect to the data source using the same DSN reference. This eliminates the need to separately configure each application that needs access to a given database; instead you instruct the application to use a pre-configured DSN.
Loading and unloading of the driver required to access a specific database as defined within the DSN. For example, if you have configured a DSN that connects to a MySQL database then the driver manager will load the Connector/ODBC driver to enable the ODBC API to communicate with the MySQL host.
Processes ODBC function calls or passes them to the driver for processing.
나아가 ODBC Driver Manager에 대한 정의는 다음과 같습니다.
An ODBC Driver Manager is a library that manages communication between the ODBC-aware application and any drivers. Its main functionality includes:
- Resolving Data Source Names (DSN).
- Driver loading and unloading.
- Processing ODBC function calls or passing them to the driver.
Most ODBC Driver Manager implementations also include an administration application that makes the configuration of DSN and drivers easier. Examples and information on ODBC Driver Managers for different operating systems are listed below:
- Windows: Microsoft Windows ODBC Driver Manager (
odbc32.dll). It is included in the Windows operating system. See http://support.microsoft.com/kb/110093 for more information.- macOS: ODBC Administrator is a GUI application for macOS. It provides a simplified configuration mechanism for the iODBC Driver Manager. You can configure DSN and driver information either through ODBC Administrator or through the iODBC configuration files. This also means that you can test ODBC Administrator configurations using the
iodbctestcommand. See http://support.apple.com/kb/DL895 for more information.- Unix:
- unix ODBC Driver Manager for Unix (
libodbc.so). See http://www.unixodbc.org, for more information.- iODBC Driver Manager for Unix (
libiodbc.so). See http://www.iodbc.org, for more information.
조금 긴 설명이지만 핵심만 요약하자면, Driver Manager는 크게 세 가지 역할을 하고 있습니다.
- DSN을 다룬다(resolve)
- 특정 DB에 접근하기 위해 필요한 Driver를 로딩/언로딩한다
- ODBC 함수를 처리하거나, Driver에게 전달한다
그리고 운영체제별로 서로 다른 Driver Manager를 사용합니다(Windows - MicroSoft Windows ODBC Driver Manager, macOS - ODBC Administrator/iODBC Driver Manager, Unix - UnixODBC Driver Manager for Unix/iODBC Driver Manager for Unix).
DSN은 나중에 알아보기로 하고, 여기서 말하는 Driver란 무엇일까요?
IBM에서 ODBC Driver에 대한 정의를 찾아보았습니다.
ODBC drivers
An ODBC driver uses a layer of code that translates the ODBC standard API calls that the application issues into vendor-specific functions. IBM Netezza supplies an ODBC driver for many supported platforms (32 bit and 64 bit) and for many different versions of the Netezza database.
ODBC driver는 Application에서 요청한 API를 지정된 함수로 치환해주는 역할을 합니다.
위 내용을 도식화해보면 아래와 같습니다.
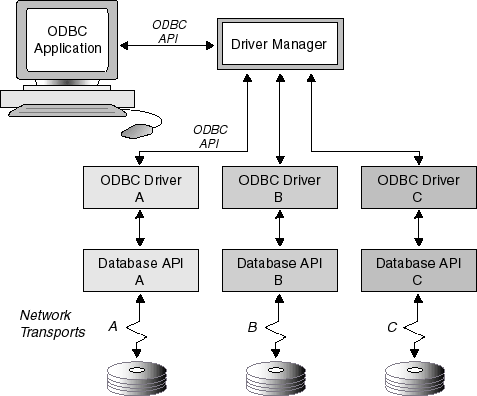
즉, Driver Manager는 적절한 Driver를 로딩하고, 로딩된 Driver는 Application에서 요구한 API를 적절한 함수로 치환하여 DB가 작업을 처리할 수 있게끔 전달합니다. 참고로, Driver Manager, ODBC Driver까지 Client가 설치하고 셋팅을 마친 상태여야합니다.

DSN(Data Source Name)
그렇다면 DSN이란 무엇일까요. 이전 항목에서 DSN은 Driver Manager가 다루고 있다고만 설명했습니다.
a data source name (DSN, sometimes known as a database source name, though “data sources” can comprise other repositories apart from databases) is a string that has an associated data structure used to describe a connection to a data source. Most commonly used in connection with ODBC, DSNs also exist for JDBC and for other data access mechanisms. The term often overlaps with “connection string”. Most systems do not make a distinction between DSNs or connection strings and the term can often be used interchangeably.
DSN attributes may include, but are not limited to:
- the name of the data source
- the location of the data source
- the name of a database driver which can access the data source
- a user ID for data access (if required)
- a user password for data access (if required)
DSN이란 data source(database)와의 연결을 정의하는 문자열이라는 설명입니다. 즉, 이를 통해 Driver Manager는 Driver, UID/PWD, read-only와 같은 연결에 필요한 정보들을 확인할 수 있습니다. 하지만, DSN은 DB 연결에 필요한 정보들이 정의되어있는 자료구조로서 connection string과는 구분되어야한다고 생각합니다.
DSN의 구분을 보면, connection string과 구분됨을 확실히 알 수 있습니다. DSN은 세 가지로 분류됩니다.
File DSNs – stored in the filesystem with one DSN per file
- System DSNs – accessible by any and all processes and users of the system, stored in a centralized location (e.g., /etc/odbc.ini, /etc/odbc_file_dsns/
) - User DSNs – accessible only by the user who created the DSN, stored in a user-specific location (e.g., ~/.odbc.ini, ~/odbc_file_dsns/
)
User DSN은 로컬에서 사용되고, System DSN은 하나의 서버에서 사용되며, File DSN은 파일로 저장된 DSN이라고 해석해도 무방할 것 같습니다.
System DSN, User DSN은 ini 확장자를 사용하여 관리됩니다. ini는 설정 파일에 사용되는 확장자입니다. File DSN은 DSN 확장자로 저장됩니다.
아래는 unix, maxOS에서 DSN(odbc.ini)의 예시입니다.
# [DSN name]
[MSSQLTest]
Driver = ODBC Driver 17 for SQL Server
# Server = [protocol:]server[,port]
Server = tcp:localhost,1433

# Note:
# Port is not a valid keyword in the odbc.ini file
# for the Microsoft ODBC driver on Linux or macOS
각 운영체제에 맞는 Driver Manager를 이용하여 위와 같은 DSN을 설정할 수 있습니다. 해당 내용은 링크로 대체하겠습니다.
Linux, maxOS의 경우에 odbc.ini, odbcinst.ini 가 존재합니다. 이 둘은 서로 다른 역할을 가지고 있습니다.
-
The odbcinst.ini file The odbcinst.ini file has entries for all the installed drivers on your computer.
| Section | Description | Status |
|---|---|---|
| ODBC drivers | List of names of all the installed ODBC drivers | Optional |
| ODBC driver specifications | List of driver attributes and values | Optional |
-
The odbc.ini file The odbc.ini file is a sample data-source configuration information file.
| Section | Description | Statu |
|---|---|---|
| ODBC Data Sources | This section lists the DSNs and associates them with the name of the driver. You need to provide this section only if you use an ODBC driver manager from a third-party vendor. |
Required |
| Data Source Specification | Each DSN listed in the ODBC Data Sources section has a Data-Source Specification section that describes the DSN. | Required |
| ODBC | This section lists ODBC tracing options. | Optional |
odbcinst.ini 파일은 ODBC driver에 대한 명세를 담고 있습니다. 아래와 같은 포맷으로 저장됩니다.
[ODBC Drivers]
DataDirect 8.0 Oracle Wire Protocol=Installed

[DataDirect 8.0 Oracle Wire Protocol]
Driver=ODBCHOME/lib/ivora28.so
APILevel=1
ConnectFunctions=YYY
DriverODBCVer=3.52
FileUsage=0
HelpRootDirectory=ODBCHOME/help/OracleHelp
Setup=ODBCHOME/lib/ivora28.so
SQLLevel=1

[ODBC]
#This section must contain values for DSN-less connections
#if no odbc.ini file exists. If an odbc.ini file exists,
#the values from that [ODBC] section are used.

IANAAppCodePage=4
InstallDir=ODBCHOME
Trace=0
TraceFile=odbctrace.out
TraceDll=ODBCHOME/lib/ivtrc28.so
ODBCTraceMaxFileSize=102400
ODBCTraceMaxNumFiles=10
이제 이 정보들을 이용해 python, R에서 데이터베이스와 연결하는 방법을 살펴봅니다.
Connection to Database in Python
pyodbc
데이터베이스와의 연결을 위해 가장 많이 사용되는 패키지입니다.
pyodbc.connect(*connstring, autocommit=False, timeout=0, readonly=False,
               attrs_before=None, encoding='utf-16le', ansi=False, **kwargs)
pyodbc.connect()는 connstring, 즉 “ODBC connection string”을 local driver manager에게 전달합니다. connection string은 driver, udi, password와 같이 데이터베이스 연결에 필요한 정보들을 포함하고 있습니다.
위에서 살펴보았듯이, 1. Driver를 명시하여 연결하거나 2. 사전에 정의된 DSN을 이용하는 방법이 있습니다.
- Driver를 명시하여 연결
먼저 사용하고자 하는 Driver가 설치되어있는지 확인해야합니다.
# Windows
PS C:\> Get-OdbcDriver
# 설치되어있는 Driver 목록 출력
# Linux, MacOs
(base) gyuhoonkim@GyuhooncBookAir ~ % odbcinst -j
unixODBC 2.3.9
DRIVERS............: /etc/odbcinst.ini
SYSTEM DATA SOURCES: /etc/odbc.ini
FILE DATA SOURCES..: /etc/ODBCDataSources
USER DATA SOURCES..: /Users/gyuhoonkim/.odbc.ini
SQLULEN Size.......: 8
SQLLEN Size........: 8
SQLSETPOSIROW Size.: 8
# /etc/odbcinst.ini 를 조회하여 Driver 설치 목록 확인
ODBC Driver 17 for SQL Server가 설치되어있다고 가정하면, 아래와 같은 connection string을 인자로 전달하여 데이터베이스와 연결합니다.
import pyodbc
# Some other example server values are
# server = 'localhost\sqlexpress' # for a named instance
# server = 'myserver,port' # to specify an alternate port
server = 'tcp:myserver.database.windows.net'
database = 'mydb'
username = 'myusername'
password = 'mypassword'
cnxn = pyodbc.connect('DRIVER={ODBC Driver 17 for SQL Server};SERVER='+server+';DATABASE='+database+';UID='+username+';PWD='+ password,
                     autucommit = True)
cursor = cnxn.cursor()

#쿼리 실행 결과
import pandas as pd
df = pd.read_sql("SHOW TABLES", cnxn)

#쿼리 실행
count = cursor.execute("""
INSERT INTO SalesLT.Product (Name, ProductNumber, StandardCost, ListPrice, SellStartDate)
VALUES (?,?,?,?,?)""",
'SQL Server Express New 20', 'SQLEXPRESS New 20', 0, 0, CURRENT_TIMESTAMP).rowcount
print(count)
- 사전 정의된 DSN을 이용하여 연결
Driver Manager를 통해 정의한 DSN을 전달하여 데이터베이스와 연결할 수 있습니다. 먼저, 정의된 DSN을 확인합니다.
# Windows
PS C:\> Get-OdbcDsn
# DSN 목록을 출력
# Linux, MacOs
(base) gyuhoonkim@GyuhooncBookAir ~ % odbcinst -j
unixODBC 2.3.9
DRIVERS............: /etc/odbcinst.ini
SYSTEM DATA SOURCES: /etc/odbc.ini
FILE DATA SOURCES..: /etc/ODBCDataSources
USER DATA SOURCES..: /Users/gyuhoonkim/.odbc.ini
SQLULEN Size.......: 8
SQLLEN Size........: 8
SQLSETPOSIROW Size.: 8
# /etc/odbc.ini 를 조회하여 DSN 목록 확인
MYMSSQL1이라는 DSN이 존재한다고 가정해봅시다. 그리고 해당 DSN은 이미 uid, password 정보까지 포함하고 있습니다.
cnxn = pyodbc.connect('DSN=MYMSSQL1;schema=test', autocommit=True)
# test schema에 연결
# DSN 생성 시에 UserName, Password가 지정되어서 따로 적지 않아도 실행됨(설정에 따라 달라질 수 있음)
이외에도 database에 특화된 PyMongo, PyMssql, PyHive 와 같은 패키지가 존재합니다. 사용 방법은 pyodbc와 크게 다르지 않기 때문에 각 패키지에 대한 예시는 생략하겠습니다.
Connection to Database in R
R은 몇 가지 패키지를 사용해서 데이터베이스와의 연결을 구현합니다. connection string을 조합하여 인자로 전달해야한다는 것은 python과 똑같습니다.
# Connection using Driver
server = 'tcp:myserver.database.windows.net'
database = 'mydb'
username = 'myusername'
password = 'mypassword'
conn = DBI::dbConnect(drv = odbc::odbc(),
                      driver = "ODBC Driver 17 for SQL Server",
                      server = server,
                      database = database,
                      uid = username,
                      pwd = password)

# Connection using DSN
dsn = 'MYMSSQL1'
conn = DBI::dbConnect(drv = odbc::odbc(),
                      dsn = dsn)
R 패키지의 장점은 pyodbc가 cursor.execute(query) 만으로 테이블 적재, 드랍, 삽입을 수행해야하는 것에 비해, 쿼리를 작성하지 않아도 data.frame 을 데이터베이스에 적재하거나, 테이블을 삭제하는 등의 기능을 기본적으로 제공한다는 점입니다.
| func | details |
|---|---|
dbReadTable() |
Copy data frames from database tables |
dbWriteTable() |
Copy data frames to database tables |
dbCreateTable() |
Create a table in the database |
dbAppendTable() |
Insert rows into a table |
dbRemoveTable() |
Remove a table from the database |
dbListTables() |
List remote tables |
dbListFields() |
List field names of a remote table |
dbExistsTable() |
Does a table exist? |
dbListObjects() |
List remote objects |
sqlRownamesToColumn() sqlColumnToRownames() |
Convert row names back and forth between columns |
import pyodbc
import pandas as pd
# insert data from csv file into dataframe.
# working directory for csv file: type "pwd" in Azure Data Studio or Linux
# working directory in Windows c:\users\username
df = pd.read_csv("c:\\user\\username\department.csv")
# Some other example server values are
# server = 'localhost\sqlexpress' # for a named instance
# server = 'myserver,port' # to specify an alternate port
server = 'yourservername'
database = 'AdventureWorks'
username = 'username'
password = 'yourpassword'
cnxn = pyodbc.connect('DRIVER={SQL Server};SERVER='+server+';DATABASE='+database+';UID='+username+';PWD='+ password)
cursor = cnxn.cursor()
# Insert Dataframe into SQL Server:
# 반복문을 통해 각 row를 INSERT
for index, row in df.iterrows():
    cursor.execute("INSERT INTO HumanResources.DepartmentTest (DepartmentID,Name,GroupName) values(?,?,?)", row.DepartmentID, row.Name, row.GroupName)
cnxn.commit()
cursor.close()
위와 같이 반복문을 이용해 각 row를 삽입하는 코드를 작성해야하는 pyodbc와 달리,
server = 'yourservername'
database = 'AdventureWorks'
username = 'username'
password = 'yourpassword'
conn = DBI::dbConnect(drv = odbc::odbc(),
                      driver = "SQL Server",
                      server = server,
                      database = database,
                      uid = username,
                      pwd = password)
df = read.csv("c:/user/username/department.csv")
dbAppendTable(conn, df, 'HumanResources.DepartmentTest')
R에서는 dbAppendTable() 하나만으로 위 작업을 수행하게 됩니다.
다음에는 hive, pyhive에 대해서 적어보겠습니다.
[참고]